
DIY solar power projects have always been fascinating to me. I kind of wrote the book on the subject. And since electric bikes have always been a huge part of my life, combining the two has always seemed inevitable. And so with a pair of solar panels and one afternoon to kill, I rigged up a simple solar-powered electric bicycle setup that is easy to build. If you’ve ever wanted to build your own solar e-bike, hopefully this guide can show you how easy it can be!
I’ll admit that I had a bit of an ulterior motive for this project. A bigger project I’m currently planning is to add a solar panel onto the roof of my electric mini-pickup truck. The goal will be to offset its daily usage with a solar trickle charger.
To plan for that, I used many of the parts first on a smaller electric vehicle: an electric bicycle. I filmed the project as well, if you want to check out my video to follow along.
This build was a bit of an exercise to see what is possible, as the end result is likely a bit bulky for many people to use for their e-bike on a daily basis. While some people actual go on long touring rides with solar e-bikes lined with big solar panels, this might be a bit more than the average rider wants to carry around.
I also covered the baskets on the front and back of my Lectric XP 2.0 e-bike outfitted with the cargo package, and most people would likely want to add some type of hinge to the panels so they don’t completely block their baskets. But enough with the caveats, let’s get down to business.

For solar panels, I actually got two different Renogy 50W panels. I wanted to test the differences, so I chose one flexible panel and one rigid panel.
The flexible panel is slightly wider and longer, but is actually less than half of the weight despite the larger footprint.
I was able to mount the rigid panel directly to the front basket, but I prepared a particle board support for the flexible panel on the rear so it wouldn’t flop too much during riding and damage the panel.
Both panels were easy enough to affix directly to the cargo package on my Lectric XP 2.0 e-bike. If your e-bike doesn’t have front and rear racks, you’ll likely have to get creative when you plan your solar e-bike.
I used some two-core 16AWG wire (probably overkill) and a set of MC-4 solar connectors to wire up the panels and connect them to my charge controller.

The charge controller is a 400W MPPT unit that can be programmed to the correct output voltage (in this case 54.6V for a 48V 13s e-bike battery). I got mine for about $75 from Grin Technology in Canada. You can find the same one for half the price if you don’t mind waiting a couple weeks for shipping from China for your solar e-bike project.
Credit for the suggestion to use this charge controller goes to another neat solar-charging electric bike project I featured recently.
I have the phone holder accessory from Lectric eBikes on my handlebars, and it was the perfect size to mount the charge controller.
I thought that would make it possible to read the charge controller’s screen while riding, but the screen is so hard to make out in direct sunlight that it’s really only readable when I’m stopped in the shade or can use my hands to block the sun on the screen.
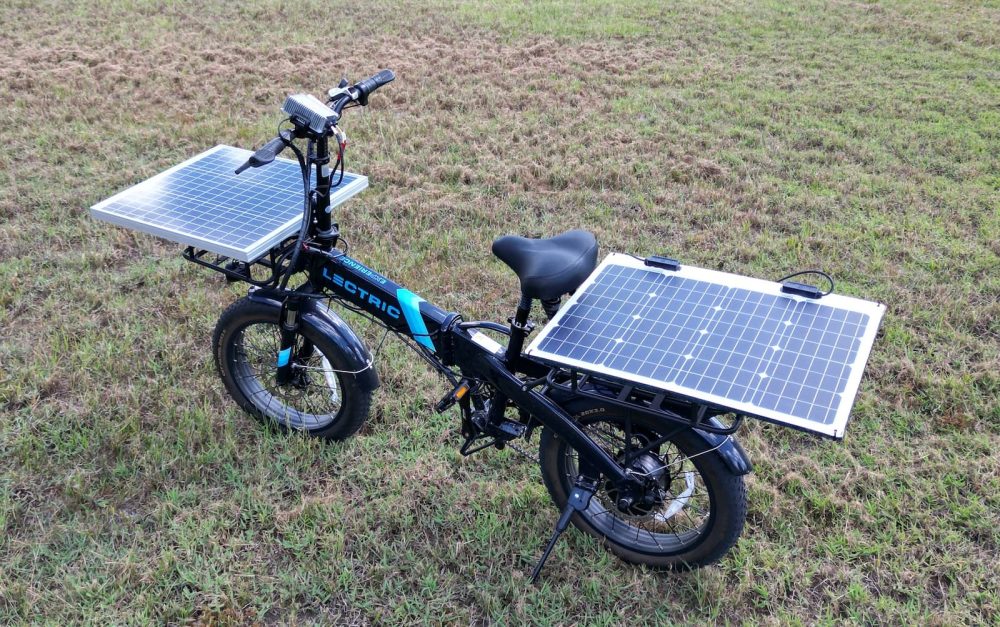
With the panels wired into the charge controller’s input and a DC barrel connector wired into the charge controller’s output, I simply plugged the barrel connector into the e-bike’s charge port and the battery began charging as soon as I rolled into the sun. And with that, I had my very own DIY solar e-bike!
Many e-bikes like the Lectric XP 2.0 can operate while the battery is also charging, but not all e-bikes have this feature. You’ll want to check to see if your e-bike can do this before starting out on this project. But since mine can, the setup simply starts charging as soon as I hit the sun, and the panels stop charging the battery whenever I pull back into the garage (or when a big cloud covers the sun).
Power output is variable, but I’ve found that in midday summer sun I can get nearly 80-85 watts from the pair of 50W panels, which is actually quite good performance. That’s not enough to offer unlimited range, since I’m draining the battery by around 350-700 watts on average depending on how hard I’m riding.
But with eight hours or so of Florida sun, it’s reasonable to expect a nearly full recharge of the 500Wh battery each day. Of course that would require the bike being parked outside all day, which it often isn’t. But then again, this project was also partly an exercise to see what was possible.
And with a pair of solar panels and an afternoon, it’s definitely possible to setup a simple solar charging rig for an e-bike or any other light electric vehicle.
Now just wait until I transfer this setup over to my mini electric pickup truck!
FTC: We use income earning auto affiliate links. More.


Comments